Tiling is one of the ways you can enhance the look and increase the value of your house. Different sizes, shapes, patterns, types, and colors of tiles are available on the market.
Hence, you have plenty of options. Imagine you are constructing a new home or trying to renovate the house. If you plan to install 12×24 tile, you just found the perfect place!
Choosing the best adhesive is crucial as it will impact the project’s durability and overall finish. When compared to other tiles, installing 12×24 tiles is tricky. By learning the tips and tricks, you can DIY the project.
Like many other tiles, you can use thin-set mortar to adhere 12×24 tile. In contrast, the most recommended adhesive for 12×24 is medium-bed or mastic mortar. Especially for 12×24 wall tiling, you must use mastic to adhere the tiles.
It is optional to have tons of tiling experience. This blog provides essential information about installing 12×24 wall tiles and the best adhesives you can use.
12 x 24 Tiles

Although you call them 12×24 tiles, their actual size is 11.75 x 23.75. This is because the tiles will shrink slightly when fired and cooled.
Recently, 12×24 tiling has become one of the more common flooring options. There are varieties of patterns and colors in this size. The 12×24 tiles are more durable and produce a modern look.
Anyway, installing 12×24 tiles is more challenging than 12×12 tiles. Hence, we have provided some valuable tips to simplify your tiling process.
The Best Tile Adhesive for 12 x 24 Wall Tiles
When selecting the suitable adhesive to bond your 12×24 tile to the wall, you must check on the material.
Whether you work with ceramic, porcelain, vinyl, or other tile materials, you can choose the adhesive according to the material. The following are some of the best adhesives for bonding 12×24 tiles.
Mastic Adhesive
Mastic adhesive is an excellent choice for wall tiling. Hence, you can use this adhesive for 12×24 tiling.
Mastic adhesive is a premixed bonding agent that you can directly apply to the substrate during application.
As it is a ready-to-use adhesive, you don’t have to do any premixing. Therefore, the process is more manageable.
Medium-Bed Mortar
When installing tiles larger than 15 inches, it is better to use medium-bed mortar. This adhesive is specially designed for installing heavy tiles.
The medium-bed adhesive can hold heavy tiles compared to the thin-set mortar.
Thin-set Mortar
You can also use traditional thin-set mortar when bonding 12 x 24 tiles to the wall. When handling heavy tiles, it is better to prioritize the mastic mortar or medium bed.
Anyway, the correct application of thin-set mortar will also perform well.
Epoxy Mortar
Epoxy mortar is a costly adhesive compared to other tile adhesives. Yet this product is an excellent choice for heavy-duty areas.
You can mix the two components of this mortar before the application process.
How to Install 12 x 24 Wall Tiles?
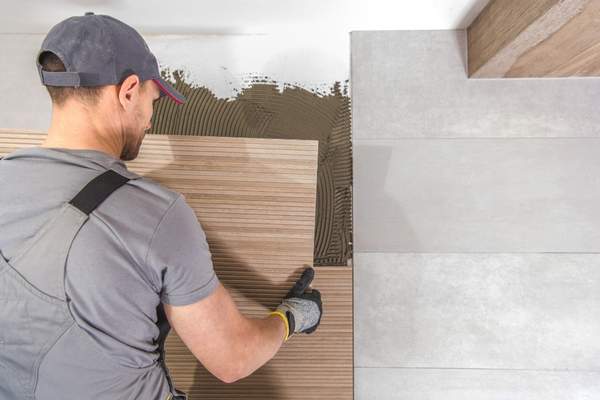
When installing the 12×24 wall tiles, it is necessary to know the process. Following is a step-by-step guide on how you can install these tiles.
Safety Precautions
Before you start DIYing the tiling project, ensure to wear safety gear. As you will be cutting tiles, it is better to cover the eyes using a goggle. Also, wear a pair of gloves and protective clothing.
Step 1
Ensure that the walls are level and debris-free. Clean the wall using an old cloth and water. If there are any cracks, ensure to fill them before installing the tiles.
Step 2
Choose a suitable adhesive to bond the 12×24 wall tiles well.
We have listed some of the best adhesives, which will be helpful when choosing the right adhesive.
Step 3
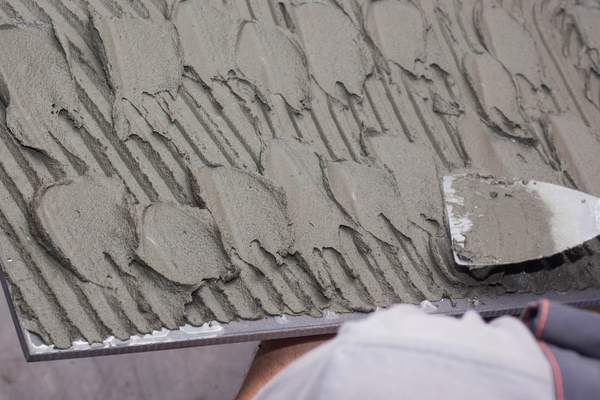
Using the notched trowel, apply the adhesive to the wall. To obtain a firm bond, apply an even layer of glue on the back of the tile. Next, press the tile on the adhesive using your hand.
Note: Applying the mortar to the back of the tile and the wall will help obtain 90% to 100% coverage.
Step 4
Dip the sponge in water and clean the face of the tile to remove excess adhesive. Before sticking the following tiles, fasten the clips for the T-Lock system.
These clips will prevent the glue from collecting along the edges of the tiles. Also, it will help to get even grout lines.
Step 5
Repeat the process when installing the next tile. Once you install the second tile, ensure to place the wedges in the clips (the lash leveling system) between the first and second tile and tighten it using a plier.
Continue the application for the rest of the tiles.
Step 6
When installing the corner tiles, you can take measurements and cut the tiles using a tile cutter.
Step 7
Once you have completed tiling the walls, allow the adhesive to cure.
It may take around 24 to 48 hours, depending on the type of adhesive.
If you are working on a moist area like the bathroom, it may take as long as 72 hours.
Step 8
After the adhesive dries, remove the T-locks and start grouting the 12×24 wall tiles.
Note: Using ¼ inch spaces will help obtain perfect grout lines.
Where to Use 12×24 Wall Tiles

Back then, everyone used 12×24 wall tiles for tiling the bathroom walls. Nowadays, 12 x 24 wall tiles have different patterns and shades.
You can use them for tiling the bathroom, kitchen, living room, bedroom, and many other places in your house.
The innovative design of 12×24 wall tiles provides a modern look. Using large wall tiles makes the room look bigger.
Final Thoughts
You might have understood the best adhesive for 12 x 24 wall tiles. Reading the 12×24 wall tile installation process will give you some tips for your DIY tiling project.
Although installing 12×24 is tricky, it is not impossible; hence, you can do it independently by following the instructions.
Hiring a professional is better if tiling differs from your cup of coffee. The experts will help to install the 12×24 wall tiles in the right way.
FAQs
What is the Right Trowel Size for Installing 12×24 Wall Tiles?
You can use the 1/2×1/2 notched trowel when applying adhesive to bond 12×24 wall tiles.
You can also use any other trowel that will perform well.
Can I Use Thin-set to Install 12×24 Wall Tiles?
Yes, you can apply the thin-set to bond 12×24 wall tiles.
Although this is a suitable adhesive, using medium-bed or mastic mortar on heavy tiles is better.
What is the Thickness of the Groutline for 12×24 Wall Tiles?
Generally, when installing 12×24 tiles, you must have 3/16″ grout lines.
For further clarification, you can also check the manufacturer’s guidelines.