We previously discussed the different tasks you can accomplish with your mini excavator. From digging out stumps all the way to digging trenches and pools, or even leveling the ground; the possibilities are endless. They are considered to be the most versatile “toys” construction workers have.
However, all these tasks can be performed impeccably only by experts who have been in the field for a long time. DIY-ers need to be careful when operating a mini excavator and make sure they don’t tip it over or end up damaging it otherwise.
Operating a mini excavator is pretty easy as long as you know how to drive a car. However, it is slightly more complicated than sitting in the driver’s seat and using the pedals and gear shift. With a little bit of care and some knowledge about the beast you’re in, you can easily get the task done! Here, we’ll look at the basics you need to familiarize yourself with to use a mini excavator properly.
Using a Mini Excavator – Some Issues That You Could Face
Before we get into the how-to, let’s consider some of the issues you can possibly face when using a mini excavator for the first time.
- Getting stuck! Many first-timers fail to plan properly and end up with a level surface all around them. The problem? There’s no way out of the trench. Always make sure you’re REVERSING out of the trench. Start digging or leveling as far away as you can and then work your way toward yourself. Don’t get stuck!
- Using the wrong attachment. A prime example is the leveling attachment. Many DIY-ers end up using the bucket or the plough in front to do the deed. Trust us, we did the same. When leveling, rent out a plate compactor to make it easier on yourself.
- Not focusing on your treads. Don’t just focus on where your boom/claw is facing. Always remember which direction your treads are facing.
- Starting the machine when not in neutral. Starting a mini excavator is easy, but doing so when in the locomotive levers are not neutral can put a lot of strain on the excavator’s axle and may break it. Although not applicable in newer models or mini excavators, some larger, older excavators would have to drive it in second gear if there is no load on it.
- Trying to do a job (that requires a professional) on your own. Know your limits. As a DIY-er myself, I understand the urge to do it yourself but you should always know when a job is out of your hands. Make a judgment call and if you’re scared, call a professional.
Tasks You Can Do Yourself With a Mini Excavator
Here is a list of tasks that you can do on your own with a mini excavator, without much training.
- Plowing snow
- Removing smaller tree stumps
- Digging small holes
- Making trenches for planting fruit/vegetables
- Small-scale landscaping
- Laying drain pipes
- Leveling the ground
Tasks You Should Call a Processional For With a Mini Excavator
Now that we’ve covered what you CAN do with a mini excavator on your own, let’s consider things that you shouldn’t do on your own.
- Digging deeper holes; such as for a pool, hot tub, or a garden pond
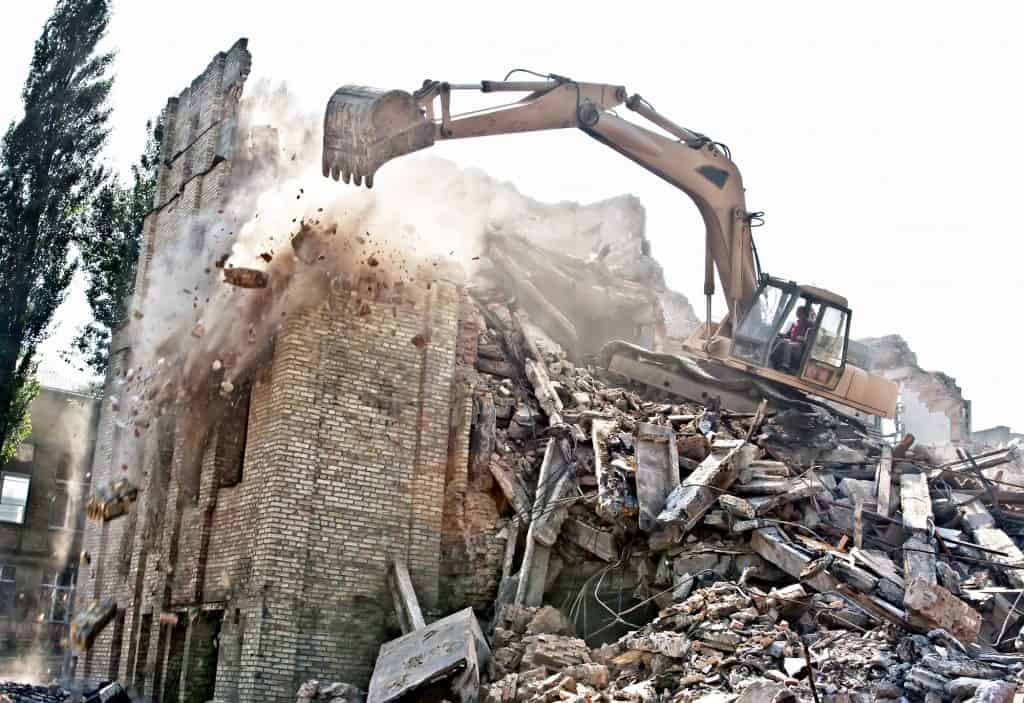
- Demolition work
- Making deeper trenches
- Repairing sewer or fresh water lines
- NEVER go near a gas or electricity line on your own. Call a professional
How to Use a Mini Excavator Safely
Now that you know what NOT to do, let’s consider what you need to do.
The steps below should get you going quickly so feel free to print these, or alternatively the below video is also a useful quick watch:
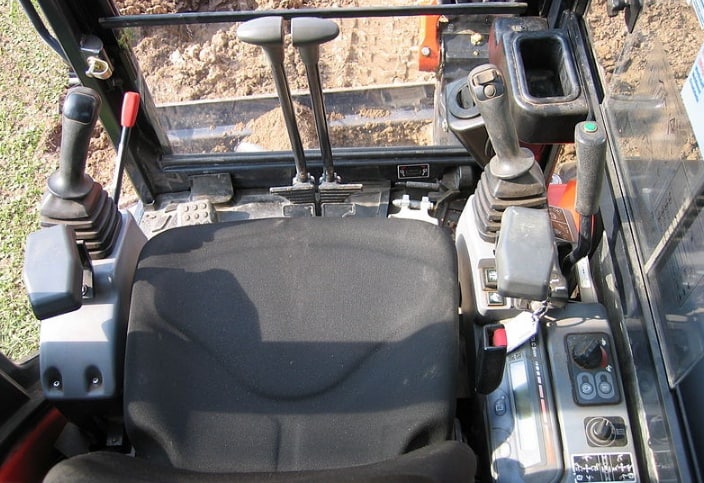
- Before climbing on the excavator, go through the operators’ manual to familiarize yourself with the excavator. If you don’t want to go through the whole book, many mini excavators have a map on their side to help you identify the controls. Remember, not every mini excavator is the same! You’ll find marked differences in Caterpillar, Bobcat, Case, Kubota, and other brands’ excavator controls.
- Circle around the excavator and make sure all the wires are connected, there is no rust on joints, and more importantly, look for warning labels and stickers. If you see any warning, read it. It often includes operating limitations and maintenance information.
- Mount your machine. Use the three-point contact principle, as discussed in our previous article. This means that you should always have at least three points of contact with the machine when mounting.
- Next to the armrest on your left, you will find the control assembly. It will either flip or slide up to come near you or be shifted out of the way. You’ll also find a lever under your seat to adjust its distance from the pedals.
- You’ll find a lever in front of you (not the joystick). Pull it and the whole panel will spring up. Adjust it according to your height. Pull the armrest back and push the lever down, and push the lever back into place.
- Look around and familiarize yourself with the different controls and gauges you see. Some excavators have a key; some have a button on the right side of the front joysticks.
- Put your seatbelt on.
- At this point, grip the joystick softly and move it around a bit to get a good feel. The joysticks usually control the bucket and boom.
- Next, grab the long levers in front (between your legs). These control movement. The left joystick controls the left track, while the right one controls the right track.
- If you push them forward, the mini excavator will move forward.
- Pushing just one of them will make that tread to move while the other won’t; thus helping you turn.
- Pulling will have a similar impact, but in the opposite direction.
- Pushing one stick while pulling the other will help you spin in one place.
- How far you push these levers will determine the throttle. The farther you push, the faster your mini excavator will move. USE THESE CONTROLS CAREFULLY.
- Determine the direction of your treads before doing anything. You can do a 360° turn with your boom and may end up losing track of which way your treads are facing. If that happens, look for an arrow on your treads. They will be pointing toward the ‘forward’ direction.
- You’ll see two pedals underneath.
- The smaller pedal (or a button) on the left side is used when you really need to get somewhere in a hurry. Think of it as an accelerator. Only use this on a smooth and straight surface/road.
- The larger pedal on the right side will be covered with a hinged plate. This plate opens up thus making it a 2-way pedal. This pedal is used to pivot the excavator’s hoe left and right. Try not to use this that often because if you fail to realign the hoe, your chances of tipping over will increase considerably.
- On the right hand side, you will find an instrument cluster along with 2 more joysticks (smaller).
- The one at the back (smaller one) will adjust the throttle. The farther back you pull it, the more power your engine will supply to the bucket or the hoe.
- The one in the front (larger one) is used to control the front blade. You can use this level to raise or lower the blade; useful for pushing debris or filling holes.
- Check if the machine is in neutral. To do this, leave the steering sticks and wait for them to return to their neutral position. Mini excavators don’t usually have a gear system to worry about.
- Put the blade in front of you, realign your cab with the treads, and now, it’s time to start. Push the button or turn the key.
Think of driving a mini excavator as driving a very heavy (and potentially dangerous) car. We recommend running it in an open field first and then taking it closer to your home.