Tiled surfaces add a modern feel and are more durable than floorboards. However, there is more to making the switch than just popping a layer of shiny tiles directly onto your floor planks. Floorboards are flexible and sometimes even creak a little when you walk over them, so they need support to transform into a rock-solid foundation for your tiles.
Tiles should not be laid directly onto floorboards. Floorboards must be prepared and sealed before a tiled surface can be added. Preparation of the floorboards includes securing them and adding a sturdy solid base of plywood and cement board. A tiled surface can then be applied.
Rigid tiles and springy floorboards are not ideal partners, but you can do a little matchmaking. By adding a protective shield between the two surfaces, it is possible to create a professional-looking, durable tiled surface on top of old floorboards. Let’s get right into it so you can start your next DIY home makeover and neatly tile your wooden floors like a pro.
Should You Lay Tile Directly On Floorboards?

You should never lay tiles directly on top of floorboards. Sure, it may look perfect for a short while, but before long, you will start to notice the grout joints splitting, or worse still, some of the tiles could crack.
Wood is a flexible, porous material. Tiles are rigid and made to stay put and provide a solid surface. So if you place a brittle breakable surface directly on top of springy floorboards, it would be a recipe for disaster.
Think of your tiled surface like a sheet of glass. If you lay a glass sheet on top of a flat concrete slab, it would be perfectly safe to place weight on. But if you put that same sheet of glass on top of a trampoline surface and add weight, it would almost certainly break.
The second reason it really isn’t a good idea to lay tiles directly onto a wooden floor is that the floorboards below need to remain protected from moisture at all costs. When wood gets wet, it swells, which would spell disaster for your tiled surface. If your cute new puppy has an accident while being housetrained or a sink overflows, water could seep through the grout’s cracks and get through to the wood below.
But don’t let these challenges put you off giving your floors a chic modern tiled floor treatment. Tiles can be laid on wooden floorboards so long as the supporting joists and the boards are completely level and secure. There also needs to be a suitable membrane above the floorboards to protect them and create a suitable bonding surface for the tiles.
How To Lay Tile On Floorboards
The Tile Council Of North America stipulates two essential factors to consider when tiling over flooring like floorboards.
- Ensuring that the substrate beneath the tile is sound.
- Using the right material to bond the tile to the floor surface.
Five Steps To Tiling Over Floorboards
The thing about a tiled floor is that people tend to naturally assume that there is a solid floor beneath the surface. So to pull this project off successfully, there must be no hint of creaking floorboards from below the solid tiled surface, no matter how exciting the football game becomes.
Let’s go through a step-by-step transformation of your tired wooden floorboards into a durable modern tile surface. Don’t be tempted to skip ahead before you feel confident that each segment of the project is 100% complete. The success and longevity of the end result depend largely on each step being completed thoroughly.
This floor makeover project can be broken down into five steps:
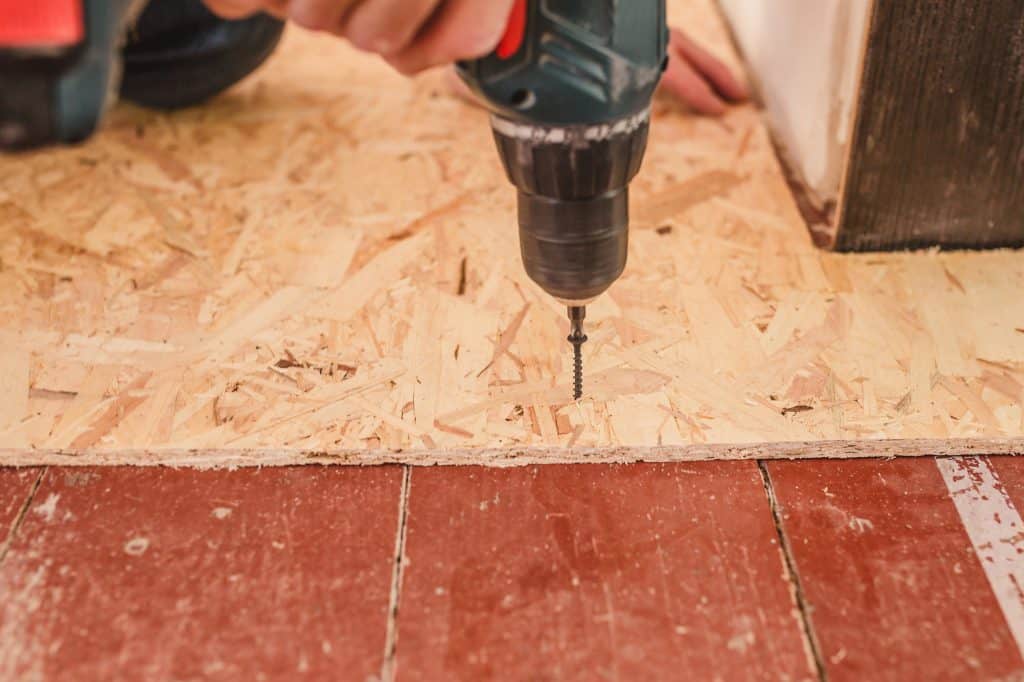
- Inspect the floorboards for movement and secure them – Before doing anything else, use 2″ screws and secure the floorboards to the joists below. Add screws liberally – along the length of the boards. Screws work better than nails because they have better ‘hold down’ strength. It’s not going to look pretty, but keep in mind that the surface is about to become the foundation for the rest of the project.
When you are done, scrutinize the floor to check for any remaining movement, springy bits, creaks, or anything that feels suspicious. A good tip is to place a glass of water on the floor and walk around it to see if you can detect significant tremors in any area. - Add a plywood subfloor – Next, cover the entire area with construction adhesive and add a ½ inch thick sheet of plywood. Screw it onto the floorboards below using 1-1/4″ screws at 6-inch intervals all around the edges. This layer forms the stable base that will support the tiles above.
- Lay a cement base board – The thickness of the backer board you use depends on how high you can go. Half inch is recommended, but if you need the final floor surface to be slightly lower, use ¼ inch thickness—factor in the height of the tile you have selected to calculate the final surface height.
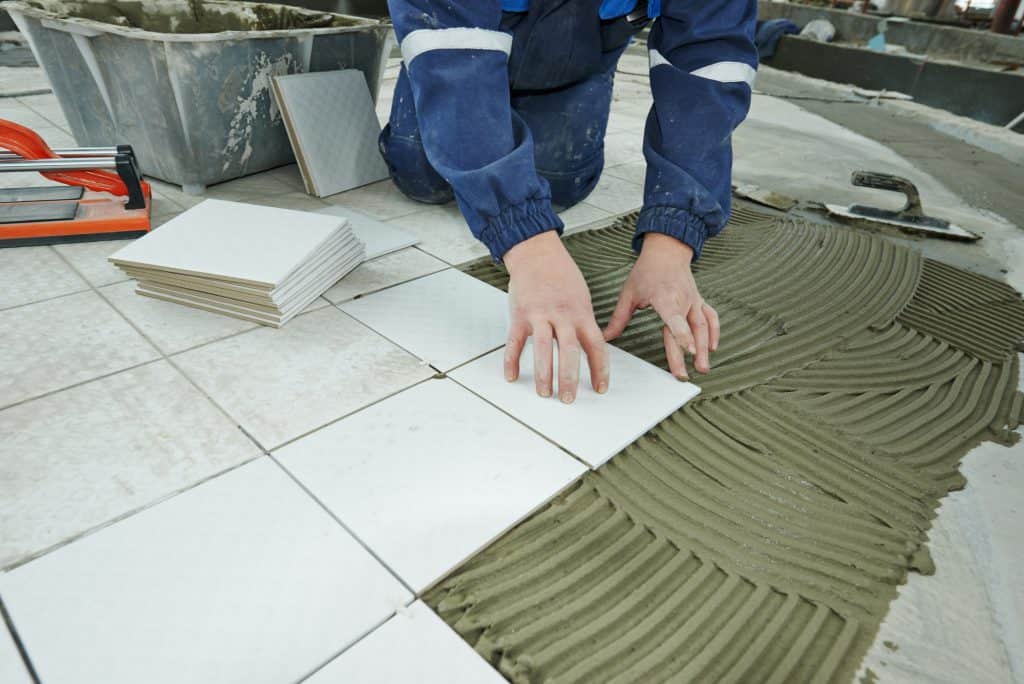
Cover all the seams between the backer board with cement board tape and add cement board screws every 6 inches along the edges. In some cases you might want to prime the cement board. - Install the tiles – Finally, the moment you have been waiting for! Lay out the basic pattern for the tiles and cut those that need to be shaped. Then use a notched trowel to evenly apply a thin layer of thinset mortar over the prepared surface and lay the tiles like you would on any other surface.
- Let them dry and add grout – Allow the newly tiled surface to dry out for at least 24 hours before grouting. Mix the grout to have the consistency of soft clay, so it is easy to work with but not runny. Use a grout float like this one from Goldblatt to push the grout into the spaces between the tiles.
Once you have filled all the joints, wipe the excess grout off the tiles using a damp sponge.
Then allow the grout to dry for a minimum of 24 hours, and your new tiled floor is complete!
Depending on the variety of tiles you are using for your new look floor surfaces, you may need to seal the surface. Super hard, glazed tiles like porcelain do not need to be sealed. Softer natural stones like terracotta or limestone tiles will benefit from a coat of protective sealant. Sealing the tiled surface will also enhance its appearance and keep it looking new for longer.
Which Are The Best Tiles To Use Over Floorboards?
If you have decided to switch from wooden floorboards to tiles, it is not only the DIY aspect of the project which is important. The entire look and feel of the result will depend on the type of tiles you select. Tiles don’t only differ vastly in color, shape, and size; they are made from a wide variety of different materials.
Fortunately, if you follow the steps and lay a solid subfloor with a cement board backer over your floor planks, you will be free to select from any style of household tile.
Tiles should not only be selected by style but also by practicality, and there are plenty of choices:
| Ceramic | More affordable than porcelain tiles. Prone to chipping but a popular tile. |
| Porcelain | Dense, smooth, and impermeable. Very versatile. |
| Terracotta Tiles | Lovely earthy colors but need to be sealed and waxed regularly. |
| Quarry Tiles | A robust, hardwearing, natural tile. It is unglazed and requires sealing. |
| Cement Tiles | Tricky to install but very hardwearing. Porous, so it must be sealed. Tiles can be sanded and resealed. |
| Glass Tiles | A good surface for bathroom floors. Easy to clean and tough. |
| Quartz Tiles | Hardwearing and lends a contemporary feel to a space. |
| Natural Stone Tiles | A lovely selection of natural stone tiles. Include granite, marble, limestone, travertine, and slate. Some need special care and regular applications of sealant. |
Choosing the perfect tile for your home is a big decision because it is not something that can be easily changed. Equally, certain tiles will take much longer to install than others (ceramic tiles are often the fastest to cut and install, for example).
When selecting, become aware of all tiled surfaces, you encounter during your day and evaluate how the style would look in your home. Once you have decided, the excitement will take over. Happy tiling!